RDP Port Change in Windows – Step-by-Step Security Guide
Remote Desktop Protocol (RDP) is one of the most powerful built-in tools in Windows. It allows users to connect to their computers, VPS, or servers remotely from anywhere in the world. Whether you’re managing a website, running SEO tools, automating tasks, or maintaining a remote server, RDP makes daily work easier and more efficient.
However, this convenience also comes with serious security risks if not properly configured.
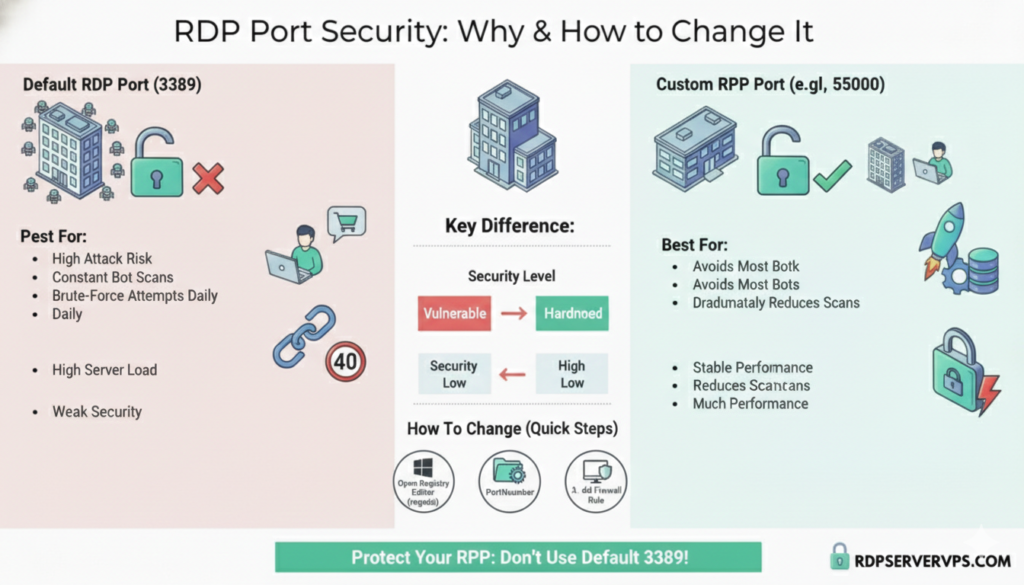
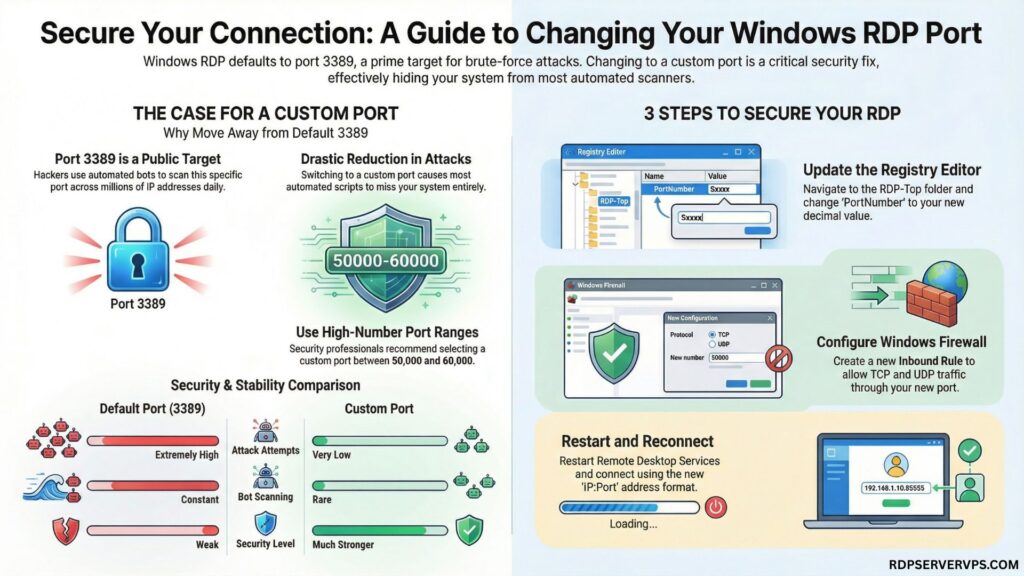
By default, Windows uses RDP port 3389. This is public knowledge. Hackers, bots, and automated scanners constantly search the internet for systems using this default port and try thousands of login combinations every day. Even strong systems can be overwhelmed by continuous brute-force attempts.
That’s why changing your RDP port is one of the smartest and simplest security improvements you can make.
In this complete guide, you’ll learn:
• What RDP network ports are and how they work
• Why attackers target the default RDP port
• How to change RDP port in Windows safely
• How to configure firewall rules properly
• How to connect using RDP with port after change
• Common mistakes and how to avoid them
• Extra security practices for stronger protection
This tutorial works for Windows 10, Windows Server, and VPS environments.
What Is an RDP Port and Why Is It Important?
An RDP port is the network communication point that Windows uses to accept Remote Desktop connections. Every service on a computer communicates through specific ports. When you open a website, it usually uses port 80 or 443. When you connect remotely using port rdp windows listens on a designated RDP network port.
By default, the RDP port for Windowsis 3389.
This means every remote login attempt goes directly through this port. Since almost every Windows system uses the same default port, attackers don’t need to guess. They simply scan for open port 3389 across millions of IP addresses.
Once they find it, automated tools begin testing common usernames and passwords nonstop.
This creates three big problems:
• Increased risk of unauthorized access
• Heavy server load from constant attacks
• Security logs filled with failed attempts
Changing the RDP port makes your system far less visible to these automated attacks.
Why Hackers Specifically Target Port 3389
Cybercriminals prefer easy targets. Instead of manually testing random ports, they focus on known default configurations.
Port 3389 is:
• Widely used by Windows systems
• Frequently left unchanged by users
• Often protected by weak passwords
Because of this, attackers build scripts that continuously scan for this port and attack it automatically.
When you change the default RDP port to a custom one, most of these bots completely miss your system. While it doesn’t replace strong passwords or other security tools, it dramatically reduces exposure.
Should You Really Change the RDP Port?
Yes. Without question.
Changing the RDP port is one of the highest-impact security improvements that takes less than 10 minutes to implement.
When you keep the default port:
• Your system is constantly scanned
• Brute-force attempts happen daily
• Server performance may suffer
• Risk of compromise remains high
When you switch to a custom port:
• Most automated attacks stop instantly
• Your system becomes harder to detect
• Security improves significantly
• Logs stay clean and manageable
Default vs Custom RDP Port Comparison
| Feature | Default RDP Port (3389) | Custom RDP Port |
| Attack attempts | Extremely high | Very low |
| Bot scanning | Constant | Rare |
| Security level | Weak | Much stronger |
| Performance | Can drop during attacks | More stable |
| Recommended | ❌ No | ✅ Yes |
Best RDP Port Range for Windows
Security professionals recommend choosing a high-numbered port between:
50000 and 60000
This range is ideal because:
• It’s rarely scanned by bots
• It avoids common system services
• It works perfectly with Windows networking
Good examples include:
50001
51234
55000
60000
Avoid low-numbered ports and commonly used ones such as 80, 443, 21, or anything below 1024.
How to Change RDP Port in Windows (Step-by-Step Guide)
This method works for:
✔ Windows 10
✔ Windows 11
✔ Windows Server editions
✔ VPS environments
Before starting, always take a backup or create a restore point. Registry changes are safe when done correctly, but backups give peace of mind.
Step 1: Open the Registry Editor
- Press Windows + R
- Type regedit
- Press Enter
The Registry Editor will open, which controls Windows system settings.
Step 2: Navigate to the RDP Port Location
Go to the following path carefully:
HKEY_LOCAL_MACHINE
→ SYSTEM
→ CurrentControlSet
→ Control
→ Terminal Server
→ WinStations
→ RDP-Tcp
This folder contains all Remote Desktop configuration values, including the active port.
Step 3: Change the Port Number
On the right panel, locate PortNumber.
- Double-click PortNumber
- Select Decimal (very important)
- Enter your new custom port (example: 55000)
- Click OK
This updates the RDP port for Windows internally.
Step 4: Allow the New Port in Windows Firewall
This step is critical. Without it, RDP will not connect.
Create a firewall rule:
- Open Windows Defender Firewall
- Click Advanced Settings
- Select Inbound Rules
- Click New Rule
- Choose Port
- Select TCP
- Enter your new RDP port number
- Allow the connection
- Apply to all profiles
- Name it “Custom RDP Port.”
For better performance, repeat the same process for UDP as well.
Step 5: Restart System or Services
The safest method is restarting your computer or server.
Alternatively, open Services.msc and restart Remote Desktop Services.
This activates the new RDP network port.
How to Connect Using RDP with Port
After changing the port, you must specify it while connecting.
Use this format:
IPaddress: Port
Example:
192.168.1.10:55000
For VPS:
ServerIP:55000
This ensures your Remote Desktop client connects to the correct port.
Common Mistakes to Avoid
Many users face connection problems due to small errors.
Forgetting firewall rules
Without allowing the new port, Windows blocks all connections.
Using common or low ports
This keeps your system exposed to scanning.
Choosing a port already in use
This causes conflicts and connection failures.
Not testing after the change
Always test immediately to ensure access works.
Extra Security Tips for Maximum Protection
RDP port change works best when combined with other security layers.
You should also:
• Use long, complex passwords
• Enable Network Level Authentication (NLA)
• Limit RDP access by IP if possible
• Use two-factor authentication tools
• Keep Windows fully updated
Together, these steps dramatically reduce hacking risks.
Is Changing the RDP Port Enough by Itself?
It’s not the only security measure you should rely on, but it’s one of the most effective quick fixes.
In real-world environments:
• It blocks most automated attacks
• It reduces brute-force risks drastically
• It improves server stability
• It protects casual users very well
For home users, freelancers, and small businesses, this step alone provides a massive security improvement.
Final Thoughts
If you are still using the default rdp port 3389, your system is constantly exposed to automated attacks.
Changing your RDP port:
✔ Takes only a few minutes
✔ Costs nothing
✔ Blocks the majority of hacking attempts
✔ Makes your Windows remote access much safer
Whether you’re using Windows 10, Windows Server, or a VPS, this should be one of the first security steps you take.
Remote Desktop is a powerful tool, but only when properly secured.
A simple Windows RDP port change can:
Protect your system from constant brute-force attacks
Improve performance and stability
Add an essential security layer instantly
If you use Remote Desktop regularly, don’t wait. Change your RDP port today and secure your system properly.
If this guide helped you, bookmark it and share it with others who rely on RDP.
Frequently Asked Questions About Changing RDP Port in Windows
Changing the RDP port significantly reduces automated brute-force attacks by hiding your system from common scans. However, it should be combined with strong passwords, Network Level Authentication, firewall rules, and regular updates to provide complete Remote Desktop security and long-term protection.
The safest RDP port range is between 50000 and 60000 because these high-numbered ports are rarely scanned by bots and do not conflict with common system services. Choosing an unused port in this range improves security without affecting Remote Desktop performance.
Yes, the RDP port change process is the same for Windows 10, Windows 11, and Windows Server editions. It involves editing the PortNumber value in the Windows Registry and creating a firewall rule to allow the new port for incoming Remote Desktop connections.
If RDP stops connecting, first check that the new port is allowed in Windows Firewall for both TCP and UDP. Also, confirm that the correct port is used in the connection format IPaddress: Port, and restart Remote Desktop Services or the system.